Getting Your Hands Dirty

There are two things I miss tremendously since leaving our old home behind to build a new one here in Austin: my dear friends and my garden. Unfortunately, short of convincing all of my friends to follow me here (believe me, I’ve tried), there is nothing I can do about the former. The lack of a garden, however, I plan to remedy in the spring. I am a relatively new inductee into the world of avid gardening (you can read about how I began my journey here), but when I first decided to enter that world, I jumped in with both feet. With my own two hands, I built a raised-bed garden complete with four beds set into a hill, gravel walkways, and handmade trellises.

garden progress - 31

I was SO proud of it! I told my husband that I didn’t think I had created anything so beautiful since I created our sons. I’m not sure he ever fully understood my passion for it, but there is something about getting my hands in the ground – building, planting, nurturing – that is so centering for me. I discovered that being close to the earth and helping things grow is meditative and enriching.

And, of course, I am not alone. Even a cursory sweeping of the internet will show you the myriad benefits of getting our hands dirty. Here are just a few snippets I found:

  • A new study confirms that people who garden are less likely to display signs associated with unhappiness or depression. It found 80% of gardeners feel satisfied with their lives compared with 67% for non-gardeners, and 93% of gardeners think gardening improves their mood.
  • In a study by Bristol University, Mycobacterium vaccae, or M. vaccae, a “friendly” bacteria found in soil, was shown to activate a group of neurons that produce the brain chemical serotonin, enhancing feelings of well-being, much in the same manner as antidepressant drugs and exercise. Interest in the study arose when patients treated with M. vaccae for another health issue reported increases in their quality of life (Lowry, 2007)
  • Beyond raising mood, time kids spend in the dirt may be the best preparation for the classroom, according to researchers at The Sage Colleges in Troy, New York. Creating learning environments in schools that include time in the outdoors where M. vaccae is present may decrease anxiety and improve the ability to learn new tasks.” (Science Daily, 2010)
  • Dr. Mary Ruebush, immunologist and author of ‘Why Dirt is Good: 5 Ways to Make Germs Your Friends’, counts letting kids play in the dirt as immune-system-building step number one. “Let your child be a child,” she says. “Dirt is good. If your child isn’t coming in dirty every day, they’re not doing their job. They’re not building their immunological army. So it’s terribly important.” (CBS News, 2009)
  • Making direct contact with soil, whether through gardening, digging for worms, or making mud pies has been shown to improve mood, reduce anxiety, and facilitate learning. – ‘The Dirt on Dirt’ by the National Wildlife Federation

Although I have not had a chance to build my new garden yet, last weekend I was able to get out into our yard to rebuild some existing corner beds and create a small patio area for our new fire pit. These simple acts of hard, dirty work rekindled my desire to consistently connect to the earth – even if it’s just our little backyard patch of it.

10647011_10154822302770015_5235580370486538953_n

Rest assured, there will be pictures of my brand new Austin garden coming soon. Until then, get outside and get your hands dirty. Trust me, you’ll be glad you did.

Advertisement

The Mama Workout

Every now and then, someone asks me if I exercise regularly in order to maintain my girlish figure (HA!). This question does not usually come from a mother of small boys. She would not ask such a question because she knows. For those of you who aren’t in the know, here’s a small sampling of my daily “exercise routine” at the gym… er… house:

Stair-stepper: 50 reps up, 50 reps down (at least)

skateboarding-stick-figure-hi

Weight lifting: 30 to 40 lb dead-lifts (of the boy variety) – 50 reps (on a slow day)

Lifting

Leg Presses: 30 to 40 lb weights (of the boy variety) – 30 reps (did I mention PER BOY!)

images

Cardio (Including, but not limited to):

  • Running (aka chasing)
  • Aerobics (aka bending, twisting, lifting (of the non-boy variety such as laundry, toys, books, etc.))

screenshot-2014-01-03-14-40-47

  • Wrestling (aka superhero play, or any play with boys)

Wrestling

Keep in mind, this is only a sampling of my workout routine, which varies a great deal from day to day, but is never less rigorous than what I’ve described. So the next time you look at someone and think to yourself, “How does she stay in shape? She doesn’t even exercise!” Think again! If the “she” in question is a mama, she may not go to the gym or yoga class or out on the trails, but she MOST DEFINITELY exercises.

A Beginner’s Foray into Canning

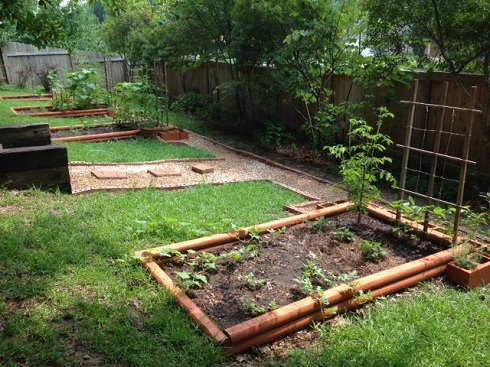
Having recently shared my thoughts about the need for more sustainable food choices and my family’s efforts toward that end, I thought it would be àpropos to show you what I’ve been doing with all the proceeds from my backyard garden. Since we do not have an extra freezer, nor the funds to get one at the moment, canning was the obvious choice for preserving our produce. And, oh boy, did we get some! I was pulling two or three cucumbers every day. The tomatoes came in spurts, ten at a time. The peppers stayed small, but we had lots of them. The cantaloupes were like nothing you’ve ever tasted! And we had herbs galore. Some things, like the peas and beans, struggled due to pests and I plan to look into some more organic options for controlling that in the future. But for a first time effort, I give myself a hearty pat on the back.

Now for my disclaimer: All that I learned about canning, I learned from Google and YouTube. I did not have a mother or grandmother who gardened or preserved to show me the ropes. So please, take everything I share here with a grain of salt and do plenty of research on your own. I am not claiming to be an expert by any means, but merely trying to help other beginners like myself get started and overcome the fear of the unknown. ‘Cause, let me tell you, it is not nearly as difficult as you may think! I was initially dreading the process, but knew that it was a necessary evil given the incredible amount of effort I had put into the garden – I wasn’t about to give it all away or let it go to waste. So I bought myself a stock pot and some canning jars, watched some online tutorials, and dove right in. And, much to my amazement, the evil turned out to be good! I thoroughly enjoyed it. Just like the garden, I found it wholesome, earthy, rich, and fulfilling. There is something so satisfying about taking a small, insignificant seed, and, through much love and hard work, turning it into rows of food that line your pantry throughout the year. So far, I have canned 20 jars of pickles, 11 jars of salsa, and 10 jars of pear sauce – and I could have done much more had I overcome my fear sooner and started the whole process right away.

So without further ado, let me tell you about the basic techniques that I followed. I will start with the process of making pickles because it is the most involved (and the one for which I took the most pictures). Sadly, the pickles turned out softer than I would have liked, but I think this is because I used ordinary garden cucumbers instead of pickling cucumbers. Next year I will plant the pickling variety and hope for a crisper result. I am told they are just as good to eat raw, so it’s a win/win.

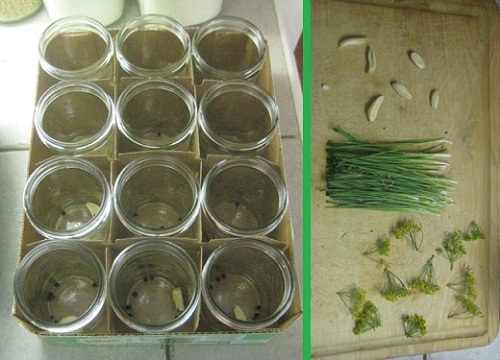
1) The first step is to slice and wash your cucumbers. They can be wedge slices, like I’ve shown here, or they can be sandwich slices, or even whole if the cucumbers are small enough. It is important to cut off the ends as there are enzymes on the blossom ends that can spoil the pickles. Also, it is best to use under-ripe rather than over-ripe cucumbers because they will likely be crisper. (This may also have been one of my mistakes leading to softer pickles than I’d like).  Put these washed and sliced cucumbers in an ice water bath for an hour or two while you get everything else ready. This is also an ideal time to put all your jars, lids and rings into the dishwasher on the sanitize cycle since this cycle takes a while to complete.

IMG_7455

2) Next, prepare your brine. I used a pickling mix, plus a few of my own garden herbs. This takes the guess-work out of how much of each ingredient to use. I used Mrs. Wages brand and it tells you the exact of amount of vinegar and water to put in the mix. Be careful not to use an aluminum pot though as this could leach a metallic flavor into your pickles and cloud the brine. Bring this to a boil and then reduce it to a simmer to keep it hot.

IMG_7461

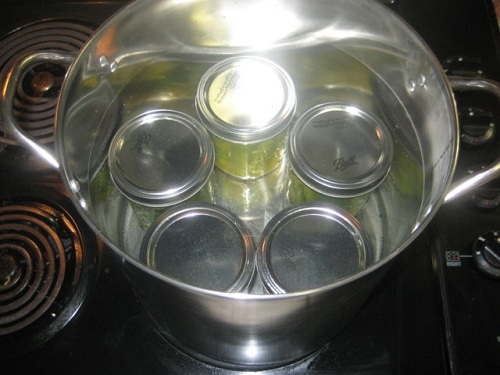
3) Now, while your brine is simmering and your pickles are chilling, prep your additional herbs and put them in the jars. I used one garlic clove, about 10 peppercorns, 3 small green onions, and one medium size dill flower in each jar. The green onions and dill flowers came from my garden. If you don’t want to use any of these additional herbs, don’t worry about it, ’cause the mix you use will work just fine. It simply adds a bit of visual interest and flavor to each jar. Also, start your canning pot boiling at this time. I used a LARGE stock pot filled about half full so it won’t overflow when you put your jars in.

IMG_7456

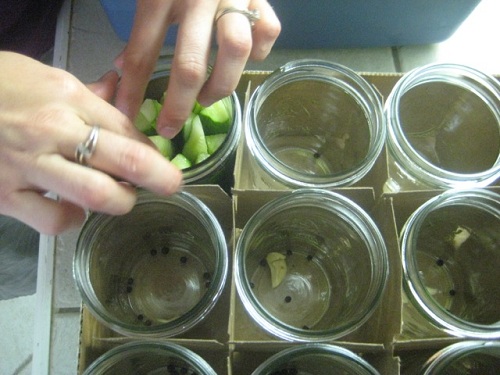
4) Next you get to fill the jars with your chilled cucumbers. Load them tightly to keep them from floating to the top of the jar and add your dill flowers last.

IMG_7464  IMG_7470

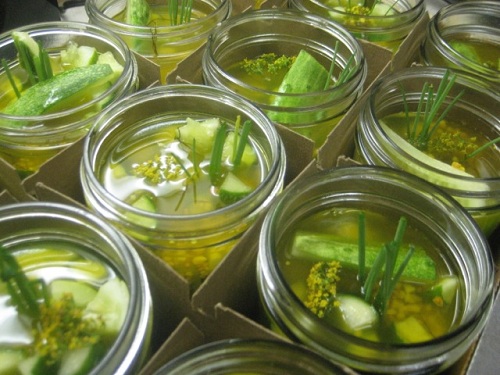
5) Now fill each jar with the brine mixture, leaving an inch of head space. Wipe the rim of each jar with a clean dry towel to ensure a good seal and put the lids and rings on the jars and tighten by hand.

IMG_7474  IMG_7476

6) Lastly, process your jars in a boiling water bath for 15 minutes for pint size jars. The water should be about an inch above the tops of the jars and the time should start when the water returns to a boil after adding the jars. The first batch I processed, I did not have a jar grabber and attempted using tongs. Needless to say, there were a few close calls with disaster and I highly recommend buying a jar grabber. You’ll thank me later.

IMG_7477

7) After removing the jars from the water bath, let them sit, unmoved for 24 hours to ensure a proper seal. Within an hour or so, you should hear the delightfully happy sound the lids pinging down as the jars seal. If any jars do not seal properly, you can either reprocess them, or put them in the fridge and use them first. They’ll be good for weeks in the fridge and the ones that did seal properly will keep for years in the pantry! Let them sit for 4-6 weeks to give them time to ferment and absorb the flavors. The wait will kill you, but it will be worth it.

Salsa: There are so many versions of salsa out there, just pick one that suits you. This is much easier than pickles because it’s not so scientific. I simply sliced and mixed up all the vegetables raw – tomatoes, green onions, white onions, bell peppers, jalapeño peppers, cilantro, and garlic. For everything but the tomatoes and the cilantro, I used a food processor. Then I added an appropriate amount (this will depend on your quantity of vegetables) of tomato sauce, vinegar, salt, and cumin. Next I mixed everything up in a big bowl, filled the sanitized jars to within an inch of head space, removed air bubbles with a rubber spatula, wiped the rims clean, sealed and processed them in a water bath for 20 minutes.

Pear (or Apple) Sauce: This was the easiest of all the canning and, although we didn’t can it when I was a child, I did make a lot of applesauce with my mother so the process was particularly nostalgic as I worked on it with my son. We used pears because I have two friends with pear trees who gave me a LOT of pears. The texture is slightly different but not significantly. The important thing here is that you buy a conical strainer with pestle or a food mill so that you don’t have to peel, core, and seed all of your pears. All you need to do is slice them and throw them in a pot to boil. Boil them until they are VERY soft and then drain off any excess water. Process them through the strainer or food mill and return them to the stove to simmer if you have to do multiple batches. Then add any additional spices to taste. It shouldn’t need any sugar if the fruit is sweet enough, but I chose to add some cinnamon. Fill the jars – leaving an inch of head space, wipe the rims clean before sealing, and process them in a water bath for 15 minute.

photo 1

If you are more experienced at canning than I am and have any helpful suggestions or tips (or corrections), I’d love to hear any feed back. This has been quite a journey for me and one I hope to continue well into the future.

Sustainable Food Choices – The Journey to Backyard Gardening

Over the past year, I have been contemplating our choices as a culture when it comes to food. Without getting into all the ins and outs of the many heated sides of this debate – organic vs. non, local vs. shipped, vegetarian vs. vegan vs. meat, raw vs. cooked, gluten vs. non, preservatives, pesticides, and food dyes, oh my! – suffice it to say that, for now, the one conclusion I have come to with certainty is that something has to change. Both for our health and for our society as a whole, we have to begin making choices that are more sustainable. Already, in our generation, we are beginning to see the consequences of bad, hasty, or financially motivated decisions and those consequences will be magnified many-fold for our children and grandchildren if we don’t commit to change. I am convinced that this change cannot begin with the government or the big businesses involved. It has to begin with us. Each consumer making more informed and socially conscious decisions to benefit not only themselves, but society as a whole and thus their own posterity. Even small changes, when implemented by the multitudes, can have a vast impact on the big picture. I am sure our food choices will continue to change and grow as we learn more and more about the way things are vs. the way we believe they should be, but for now, my family is making some changes that we believe will benefit our health, our home, our happiness, and our culture.

One major change is that we are attempting to buy as much as we possibly can from local providers. We are fortunate to have a prolific farmers market in our area that is open year round and provides locally grown, organic produce, dairy, meat, eggs, plants, soaps, and much more. We have found that we can buy all these things directly from the farmers, speak to them about their farming practices, and get advice about our decisions for almost the same price that we can get them at the grocery store. The only loss is in convenience, and that convenience comes at too high a cost. Whatever we are not able to get at the market, we will continue to buy at the grocery store – and, trust me, our choices are not always as noble as we would like them to be – but at least these concessions are a less pervasive part of our overall diet.

The second big change that we have made is very near and dear to my heart, as it has become a fulfilling and beautiful part of my everyday life. I have built and cultivated an extensive back yard vegetable garden. It is the most beautiful thing I have created since Owen and I am probably a bit too proud of it. But if it’s growth and success continues at the rate it has thus far, we will have organic, home-grown vegetables to last us through the summer and well beyond. It doesn’t get much more local than that! Anyone who has read some of my previous posts on aesthetics knows that I firmly believe that just because something is useful does not mean it has to look simply practical as well. I built my garden with my own two hands and I knew from the start that I wanted it to be a thing of beauty as well as a source of nutrition. I could easily have just plowed the “back forty” into rows and started planting (which is certainly a viable option for some, don’t get me wrong), but instead I laid out and planned 4 raised beds, leveled into a hill, framed, and surrounded by walkways. I chronicled my garden building journey with many pictures and decided to share some of them here with you. Hopefully a few of you may find inspiration as I have and be led to create your own oasis of food production.

Owen wanted to know what exactly was going on when I came home from the store with all these crazy supplies.

Owen wanted to know what exactly was going on when I came home from the store with all these crazy supplies.

After cutting the necessary landscape timbers into half lengths, the next step was to lay out the location of the beds.

After cutting the necessary landscape timbers into half lengths, the next step was to lay out the location of the beds.

The first bed I attempted to till up by hand. Needless to say, for the next three, I rented a tiller.

The first bed I attempted to till up by hand. Needless to say, for the next three, I rented a tiller.

Here, all the beds were tilled and the hill was leveled out and ready for the frames to be assembled and put in place.

Here, all the beds were tilled and the hill was leveled out and ready for the frames to be assembled and put in place.

Owen was a huge help in building the frames ;)

Owen was a huge help in building the frames ;)

And lifting them into place!

And lifting them into place!

Now all the frames were in place and I discovered the need for retaining walls to prevent the soil from washing out underneath the low end of the hill.

Now all the frames were in place and I discovered the need for retaining walls to prevent the soil from washing out underneath the frames at the low end of the hill.

Aiden was a big help in building the retaining walls! I used cinder blocks that I filled with soil so that they could be used for plants as well.

Aiden was a big help in building the retaining walls! I used cinder blocks that I filled with soil so that they could be used for plants as well.

And here aesthetics came into play. I could not abide mismatched retaining walls and bed frames, so I spray painted them.

And here aesthetics came into play. I could not abide mismatched retaining walls and bed frames, so I spray painted them.

After I completed the beds, there was a significant mud problem at the bottom of the hill. So I created a walkway. A friend gave me ALL of the bricks that he needed out of his way and I filled it will builders gravel (not landscape gravel - they are essentially the same and the builders variety is 1/3 of the price).

After I completed the beds, there was a significant mud problem at the bottom of the hill. So I created a walkway. A friend gave me ALL of the bricks, saying he needed them out of his way, and I laid them out and filled them in with builders gravel (not landscape gravel – they are essentially the same and the builders variety is 1/3 of the price).

Then it was finally PLANTING TIME!

Then it was finally PLANTING TIME!

Baby plants full of potential. The pea trellises were $30 a piece at the garden store and I needed 4! I could not stomach this so I spent $15 on a bunch of stakes and some garden twine and made my own.

Here are my baby plants, full of potential. The pea trellises were $30 a piece at the garden store and I needed 4! I could not stomach this, so I spent $15 on a bunch of stakes and some garden twine and made my own.

The addition of angled trellises for the squash and zucchini.

Later, I added angled trellises for the squash and zucchini.

Some of the first fruits.

Already, we’ve been able to harvest some first fruits!

Today, the plants are enormous and lush. We're getting some fruit almost every day. This also shows the bean trellises I built from sticks I found around the yard and some zip ties.

Today, the plants are enormous and lush. We’re getting some fruit almost every day. This also shows the bean trellises I built from sticks I found around the yard and some zip ties.

Voila!

Voila!

Let me know what you think. And please share some of your gardening success stories. I can use all the help I can get!

Thoughts Of A Working Mom On Bed Rest

It’s every working mom’s dream, right? To have plenty of time to lay around on the couch and have everyone else take care of all your responsibilities while you just . . . rest. Hmmm. You might think so until you have a doctor tell you that you have to do just that. For a month. This forced hiatus from life, otherwise known as bed rest, is anything but a fantasy, as reality sets in and you realize that you no longer have any control over your life, your home, or your children. Everything must be done for you and your bank account slowly reminds you why it is that you and your husband both work. In the mean time, your hubby takes over all the details of your finances, family, work, and home while trying desperately to hang on to the last threads of sanity. You can forget romance or sweet nothings – you just hope this whole episode doesn’t crush him. Although your job has been expecting to lose you to maternity leave in a month, they find themselves spontaneously in a lurch and end up hiring a temp to replace you. You hope and pray he’s not as good as you are and everyone is glad for you to come back when you’re ready, but will they be? And your little boy, whom you adore cries in your arms every night because he misses you and there is almost nothing you can do with or for him anymore. All the people you love and care about do everything they can for you and, although you are extremely grateful, you can’t help but feel like you’ve just become a giant millstone around everyone’s neck. And there’s nothing you can do about it. You have to protect your unborn baby and bring him safely into the world when he’s ready. So you while away the hours with books and the internet and TV while your life marches on around you but without you.

Still sound like a dream? Well, it’s not exactly peachy, but there are a few things that I have learned from this whole process so far:

  • People who really care are willing to do SO much. It is more than words of sympathy, it’s service that stuns you. And although you may feel guilty for asking so much of people, you know that no one who has given anything resents what they’ve given. And it is beautiful.
  • My hubby would do anything for his family. Even when it feels like he can’t, he does. He is a man worth having and holding and I am lucky.
  • Once again, as I have said so many times before, I am reminded that we have to hold tightly to the little things. The beautiful things. And not become bogged down in difficulty. Rather than sink in the face of all that I cannot do, I need to cherish the time that I do have to read my son countless stories; do silly projects on the couch like paper plate superhero masks for his birthday; write notes of gratitude to the many people who are helping us (something I am normally so bad at accomplishing); and catch up on some blogging that pain and stress have kept me from staying on top of.
  • People so often surprise you, and most of the time in a good way. You never know who will stand up and do something extraordinary that you never expected or something small that is touching in its intimacy.
  • It is never shameful to ask for help. Those who want to give will do so gladly and those who judge you for asking can either get over it or get lost!
  • Rest is overrated! So in the future when I complain about being too busy or stressed, I need to remember that it is those very things that fill my plate and make me so busy that I miss when they are taken away. They are the building blocks of my life and add purpose and fulfillment to it. As Jonathan always says, “To be a happy man, I have to be a tired man!”
  • In the end, a month or two of hardship is tiny compared to the new life we are bringing into the world. One that will, as his brother did, completely change our lives and enrich them in ways we never even thought possible. Owen, I know you are worth it and I can’t wait meet you!

♥ For any who are interested . . . A Small Way to be a Big Help